
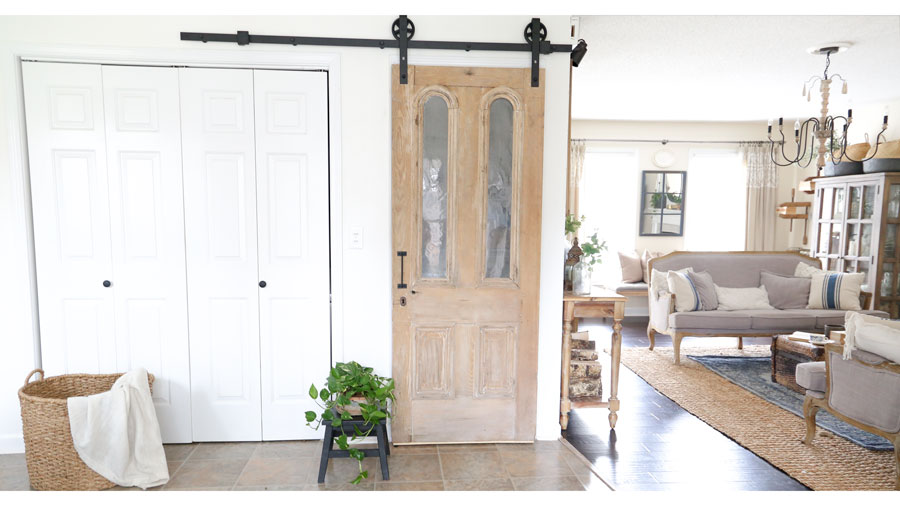
After I painted our kitchen cabinets I knew I wanted to bring in some wood tones to warm the space up a tad. With the white/gray cabinets, white counter tops, and white appliances it was feeling a little cold (CLICK HERE to see how I painted my kitchen cabinets). I brought some wood tones in with old cutting boards, the trim on our hood, and a wicker basket accent. But then there was this wall of solid white doors. These doors conceal our laundry and pantry and they were looking very plain and just... white. I know exactly what you're thinking- "she paints everything white why is she complaining about a wall of white doors?" Well the thing is, I've always wanted our pantry door to be on sliding barn door hardware. So I thought adding a raw wood antique door would be the perfect warm wood tone addition to this space.

I knew I wanted the door to be unique, of course antique, and raw wood. So when my vendor friends Kerri and Lucas from The Cotton Shed came carrying this door into the City Farmhouse show this past fall I immediately fell in love. I immediately knew it was my pantry door. It was the perfect wood tone and the details had me weak in the knees.
There is actually some design reasons for this install other than just my love for sliding doors. Another element I pull from throughout my house is black metal. So I knew sliding barn hardware would help pull just a little more of that element into the kitchen space as well. When shopping for barn door hardware or really just sliding door hardware (because obviously you don't have to use a barn door) I tried to find a budget friendly option. You all know I like a good budget friendly option, and getting the look for less. I quickly learned that prices and styles for hardware was all over the place! Some were hundreds of dollars while I found other options for just a little over a hundred. I wanted a much simpler design than the hardware I used in our master bedroom and the best price options I've found is on Wayfair.com.
I used hardware I purchased from Wayfair.com in our master bedroom and I was super happy with the quality and look of the products. You truly get the same look as other more expensive hardware for less. BUT the only downside to the Wayfair.com hardware is the instructions- they kind of stink to be honest. BUT that's where you have me! I am revamping the instructions and I'm showing/telling you how to install the hardware. That way you can get the look for less without the headache of crappy instructions.
Material & Supplies:
- Hardware Track From Wayfair.com that includes all hardware needed to install- CLICK HERE
- Pull Door Handle if needed- CLICK HERE
- Door of your choice
- Tape Measure
- Level
- Pencil
- Drill
- 7/32" Drill Bit
- Philips Head Screw Driver
- Wrench
- Thin Wood Strip for Bottom Track
- 1x6 Board if not installing directly into header. All rail mounting fasteners must be mounted directly into solid wood. Do NOT install directly into drywall.
- A Helper (Install requires two people)
Project time: 1-2 hours
Instructions:
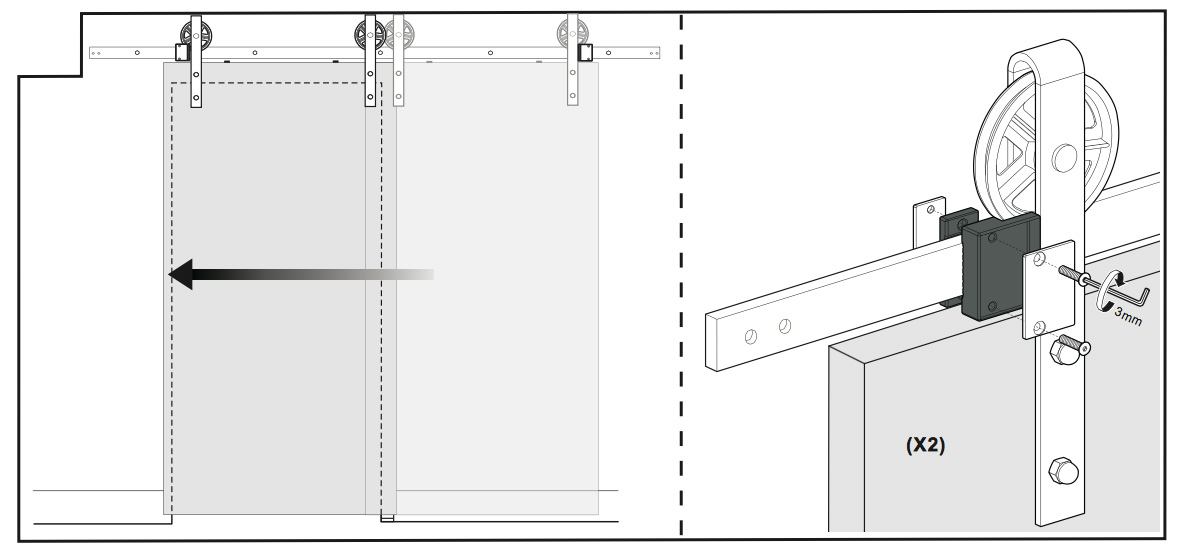
1. Measure: Measure the height of your door then add 44mm or 1.73 inches. Take that length and measure up from the floor and this is where your track will go. You also want to decide which direction you want the door to slide open. You want the last attachment point to mount 2" from the side of the opening. So your first mark should be: DOOR HEIGHT + 44mm up and 2" over from the edge of the opening on the opposite side of the way you want the door to slide open. Simply make a dot with your pencil at this spot. (NOTE: We had to modify this step because we left the moulding around our door frame. So we ended up having to move the hardware slightly higher. Which left us with a bigger gap between the top of the door and the track.)
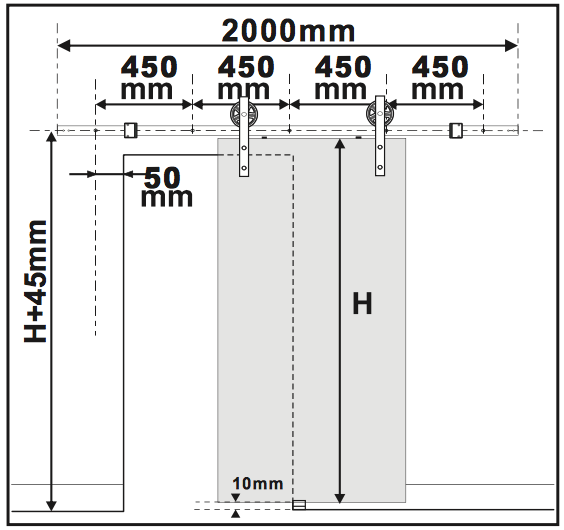
2. After you have made your first mark drill your first hole at this mark. Next attach your track to this location only. Use the bolt that came with the kit to secure the track temporary for measuring purposes. So don't worry about using the spacers just yet.
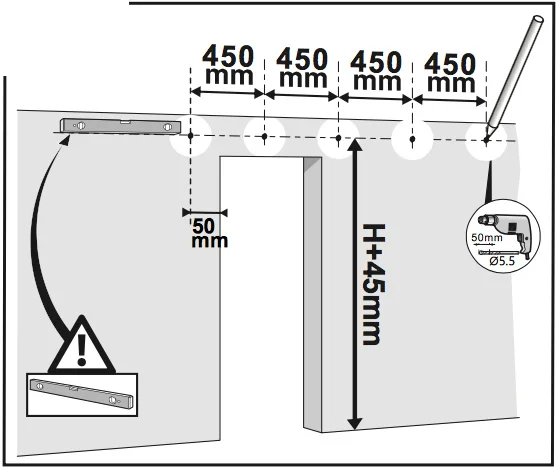
3. Once you have the track attached your going to use your level to get the track level all the way across. Once your track is level go across and mark each pre-drilled hole in the track by sticking your pencil through the holes. Note: This takes more than one person to do. One person to hold the track on the opposite end of where you attached for adjustments and one to hold and read the level. Make sure you get your track completely level or your door will not slide open properly.
4. Remove the track from the one point you have it attached. Now go down the wall and pre-drill all the holes you just marked with the pencil.
5. Now you can install the track with the spacers. The spacers go against the wall, then the track, a washer, and insert bolt through. Do this all the way across for all 5 attachment points. Tighten then down with a wrench.

6. Now you want to install the mounts on top of your door. If you used the intended measurements (door hight plus 44mm) to mount your track, then you would drill a hole through your door 40 mm down from the top of the door. Once you drill that hole hold the hardware up to the hole and mark your second hole. Drill through the second hole, put bolts through, add washer, then the nut on the end. Note: It's always a good idea to hold your door up and make sure everything is going to measure out correctly BEFORE you drill a hole through your door. Due to our door height and the moulding we were only able to put a bolt through the bottom hole. Not ideal- but it still worked just fine.

7. With help from your helper lift the door up and place the wheels on the track. Your door should roll freely back and forth. But be careful because you haven't installed your stoppers yet.
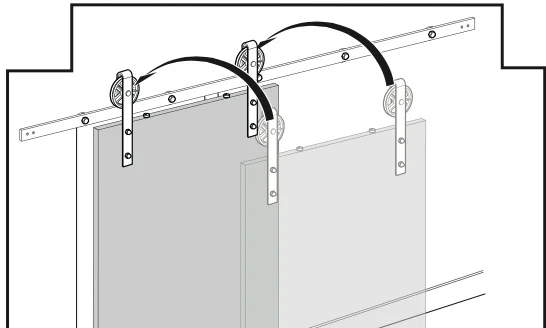
8. Next install your stoppers. Determine where you want your door to stop on each side and place the stoppers there. I placed mine where the door would stop at the edge of the opening on each side. The stoppers come apart, so just place on each side of the track, insert screws, and tighten down. Now your door can't go sliding off the rail.
9. The floor guide. The floor guide keeps your door on track and from swinging. The original instructions instructs you to cut a guide in the bottom of your door. But I didn't exactly want to cut into my antique door, so I came up with a new idea. But if you're up for cutting into your door you can mark it off and use a circular saw to cut a guide into the bottom of your door.


I used two thin strips of wood and created a groove for the guide to glide threw. I showed you the bottom of my track in the pictures above. You simply measure the length of your door and cut two 1/4" wide strips. Next you use a nail gun to attach the wood to the bottom edge of your door. Use the floor guide to see how far you need to space the next piece and then nail it to the bottom edge as well. Install the floor guide on the floor, slide your door into place, and you're done!
Hip-Hip-Hooray!! YAY!!
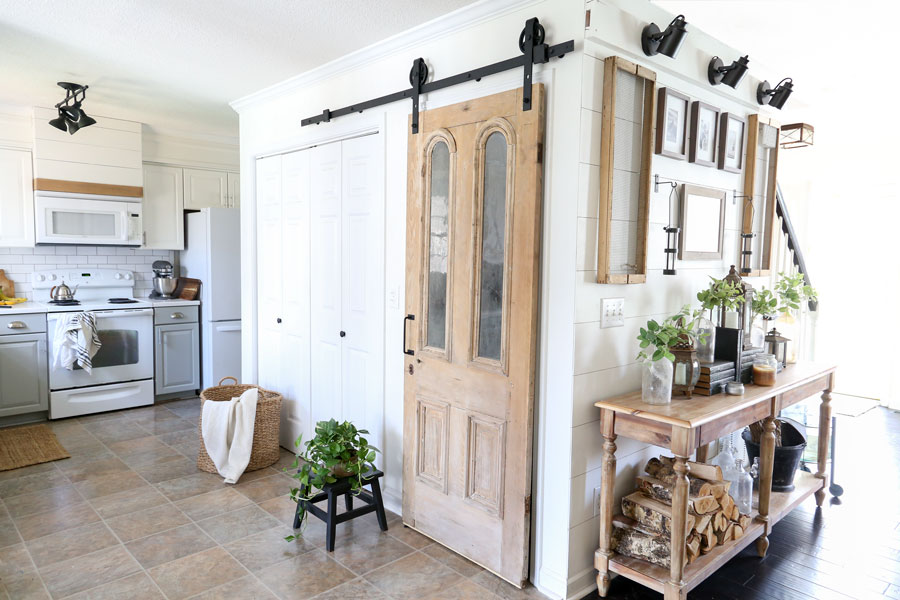


Now that you're done you can stand there in pure joy sliding your door back and forth. I did this continuously for about 5 mins. I still get happy anytime I have to throw something away because we keep our trash can in our pantry. I truly hope these instructions help you if you too decide to install a sliding door track. In case you were wondering I also painted the the wall the doors are on. I used the color Alabaster by Sherwin Williams. My next project in the kitchen area might be adding wood shelves and some sort of accent wall in the pantry. Is this something y'all would like to see?
As always thank you so much for stopping by today and reading my blog. I hope you found some inspiration for your home. Be sure to follow me over on FACEBOOK and INSTAGRAM for more behind the scenes of this little business I call life. I'm also pinning a lot more DIY projects over on PINTEREST.
With love,

*This post was not sponsored or endorsed by any of the products I used. Post may contain affiliate links, but as always all words, reviews and opinions are by yours truly.
*Click the icons on the picture below for direct product links. To shop any of the products in this post you can click on them below.
*Click the icons on the picture below for direct product links.
